Looking to upsell some items? With a little custom code we have created, you can now add an item to your cart page from a CTA click.
At a glance:
Last updated 8/10/2021
Intro
To upsell or cross-sell within a Justuno promotion we can set predetermined products to be added to the cart by a single button click.
This guide will help go over how to add the button and add custom functionality to the add the item to the cart.
These steps are for BigCommerce stores only
Prerequisites
- Must be a BigCommerce store
- A CTA button must be added to the promotion. Here is a guide on how to get this added: How to implement the CTA button | Justuno
- A variant picker will not be available through this method. If variant options are a feature that you would like to have, please speak to one of our team members about Commerce AI
Adding functionality to CTA button
- Start by adding a CTA layer from the Add layers tab when in the design canvas.
- Find the variant ID that you want to auto add to your cart, this is usually located in the URL of the product. For example: https://www.thegldshop.com/products/diamond-cuban-link-choker-10mm-in-yellow-gold?variant=36451285842
- Paste in the variant ID in the Data ID option of the CTA. Below is an image of this.

4. Copy and paste the code below under Popup JS tab.
jju(function () {
jju('.design-layer[data-layertype="standard-button"] .design-layer-editable[data-id!=""]').click(function () {
var thisVariant = jju(this).data('id');
parent.jju.ajax({
url: '/remote/v1/cart/add',
type: "post",
dataType: "text",
data: {

'product_id': thisVariant,
'action': 'add',
'attribute[1063]': 2469,
'qty[]': 1
}
}).done(function (data) {
parent.location.reload();
});
});
});
5. Update the section under- attribute[1063]': 2469, with the proper product id(eg:1063) and Variant number (eg:2469) for your product in question. This info can also be found under the 'Add' network call. This occurs when adding an item and reviewing the Network tab using the browser inspect tool.
6. Toggle the Override to ON. You are all set!
This section below covers our previous process and code. Although still active, it needs extra actions and code. To update, follow the new instructions and code above.
Adding functionality to CTA button
- Once the prerequisites have been met, head to the design canvas and enter the Custom Code section
- Enter the following code into the Pop Up JS tab:
$(function(){
  $(document).on('click', '.design-layer[data-layertype="standard-button"] .design-layer-editable[data-id!=""]', function(){
    var pass_data = {
                      'juCustom':true,
                      'item_id':jju(this).data('id')
                    };
    $.postMessage(
      JSON.stringify(pass_data),
      parent_url,
      parent
    );
  });
}); - Then, add the following code into Tab JS:
window.juIframeCatch = function(data) {
jju.ajax({
url: '/remote/v1/cart/add',
type: 'post',
dataType: 'text',
data: {
'action': 'add',
'product_id': data.item_id,
'qty[]': 1
}
}).done(function(data) {
document.location = '/cart.php';
});
} - We will reference the desired product/variant through the Data ID. To find the Data ID of your product or desired variant in BigCommerce there will be two ways to find this.
- View the product URL in the BigCommerce dashboard to find the parent product ID.
- To find the variant ID, the easiest way to will be to do a bulk export of your products.
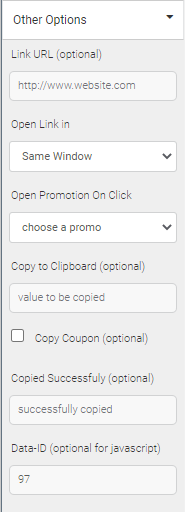
- Click on the CTA button layer and set the ID within the Data-ID field found in the Other Options submenu which will be on the right hand side. In this example our product ID was 97:

Optional: Refresh after adding the item
After an item is added to the cart, it will refresh the page. By default it will refresh and take the user to the cart page.
To remain on the current page without the redirect simply replace the statement:
document.location = '/cart.php';
With this statement:
location.reload();
Optional: Adding a Coupon Code
- Paste in the code below in the POP UP JS section and make sure both override default JS toggles are on
$(function(){
$(document).on('click', '.design-layer[data-layertype="standard-button"] .design-layer-editable[data-id!=""]', function(){
var pass_data = {
'juCustom':true,
'coupon_code':jju(this).data('id')
};

$.postMessage(
JSON.stringify(pass_data),
parent_url,
parent
);
});
}); - Paste in the code below in the TAB JS section and make sure both override default JS toggles are on:
window.juIframeCatch = function(data) {
jju.ajax({
url: '/remote/v1/apply-code',
type: 'post',
dataType: 'text',

data: {
'code': 'data.coupon_code'
}
}).done(function(data) {
location.href = '/cart.php';
});
}
